Tuesday, July 26, 2011

Orange Strawberry French Toast

I usually make a big breakfast on Sundays, but they are usually terribly creative- just your usual eggs and bacon or pancakes or plain french toast, but every once in a while I'll try something adventurous. Last Sunday I made Orange Strawberry French Toast and it was amazing.

Recipe for 2 servings

Ingredients:
               4 slices of bread
               1 egg
               1/2 cup milk
               1/4 tsp cinnamon
               1/2 tsp vanilla
               1 tbsp of sugar
               1 tsp orange zest (optional)
               2 tsp butter
                2 tbsp orange juice (fresh or from a container)
               1/2 package of cream cheese (softened)
               6 strawberries cut into small pieces
                Maple syrup (optional)

Directions: In a mixing bowl combine milk, beaten egg,cinnamon, sugar, vanilla, and orange zest and mix together. Heat a frying frying on medium heat and melt 1 tsp of the butter ( or enough to cover the bottom of the pan). then dip the bread slices into the egg mixture (making sure to coat all sides)


and fry in the pan until all sides are cooked and brown.Repeat this process until all the slices are cooked. 


While the french toast is cooking combine the cream cheese, orange juice, and strawberries into a small mixing bowl. Stir until the mixture in thoroughly combined and strawberry bits are all throughout the mixture.  It should look something like this


When two of the slices are about done cooking then scoop 1/2 of the cream cheese mixture on top of one of the bread slices. Spread the mixture out evenly on the bread and top with the other slice of toast. Cook for a minute more pressing down and flip it over. Once the middle is heated and the bread is toasted it is easy. Repeat for the other slices of bread.    When you are done just top with strawberries and maple syrup! It's so tasty!


Monday, July 25, 2011

Tufted Headboard DIY

As I mentioned earlier, we are currently re-doing our master bedroom. We did not have a headboard and since we currently can't afford our dream four poster bedroom set, we decided to make a tufted upholstered headboard during the interim. It was quite a bit of work, but so worth it! I love the headboard and it saved us lots of money. You can get one at Urban outfitters for about $350, or pay lots more at many other places.

I got the directions for making the headboard from Addicted 2 Decorating's blog. She had an amazing step by step guide that we followed. I first gathered all of the supplies, which was harder than expected. I really wanted a satiny or silky charcoal gray fabric, but I had a really hard time finding one locally. So instead of ordering the fabric online and waiting, I got a slightly satiny charcoal gray fabric from Joann's. Then I assembled all of the supplies.

You'll also need:

  • a Sharpie marker;
  • 1/2 MDF board (most stores will cut it to size for you)
  • a pencil
  • scissors
  • a tape measure;
  • a yard stick or other long straight edge for marking lines;
  • staple gun and staples;
  • your choice of fabric, large enough to cover the headboard size, plus about 18 inches on each side;
  • 2" foam, large enough to cover the MDF (this can be pieced together, if necessary);
  • hi-loft polyester batting, enough for at least two layers to cover the MDF;
  • adhesive for the foam (I prefer spray adhesive, although the fumes are quite noxious, so it has to be used outside, or you need to wear a protective mask);
  • hall ball buttons- enough for your headboard. It's a pain, but just go ahead and prepare these in advance, according to the instructions on the package.)
  • one package of thin nylon or polyester upholstery/roman shade cord (can be found in the upholstery section at JoAnn Fabrics or other fabric stores);
  • a large-eye upholstery or embroidery needle; and
  • an electric drill with 3/8" drill bit.
  • piece of pipe

John and I went into the bedroom and held the MDF in place and decided on the height and width we wanted. John cut the MDF to size for me and once we had the board cut to size we calculated the number of buttons we'd need and their spacing. John figured we would need 22 buttons for three rows. He made "saw horses" with our folding chairs. This is important you will want to have access to the bottom of the board.


While he was measuring and marking, I covered the half ball buttons with the gray fabric.

The package for the half ball buttons had great directions. They give you a template circle of fabric that you need to cut to cover the button. I went ahead and cut 22 circles out. I made sure that when I purchased the fabric I added in some length to account for the buttons. They don't take much, maybe half a yard.


Once you have the circle of fabric cut place the button on the center of it, upside down like below:


Then start folding the ends over the button hooking them on the little teeth. This was a bit challenging, I had to really pull the fabric taunt for it to work and push the fabric into the teeth. However after a bit of work I got the button to look like this:


Then you just put the button back on the button and snap it into place.


Once you are done the button looks like this and perfectly matches your head board fabric!


Then John and I cut the foam so that it would cover the MDF. I used scissors instead of a meat carving knife, but you have to be careful and make sure the cut is even. Then we used spray adhesive to attach the foam to the MDF. Once the foam was attached John made his button marks on there with the sharpie marker.

Once the foam was attached John made his button marks on there with the sharpie marker.


Then John drilled through each button mark. You need to go fast with the drill because the material will fray otherwise. It gets messy and you will need to remove any small bits of foam.


While John was hard at work, I had the job of attaching the roman shade cord to the buttons.

I cut a 12-inch length of drapery cord for each button.  Addicted 2 Decorating had an amazing tutorial. Thread the cord through the eye on back of the button, and tie a double knot in the end (A).  Tie a single knot around the eye of the button (B & C).  Thread the other end of the drapery cord through the needle (D).


I had a really hard time with this at first. First tie a double knot around the button, then take the short end of the string and tie a knot with that  and that should make your double knot one big giant triple knot.But after some mess up's I eventually ended up with this


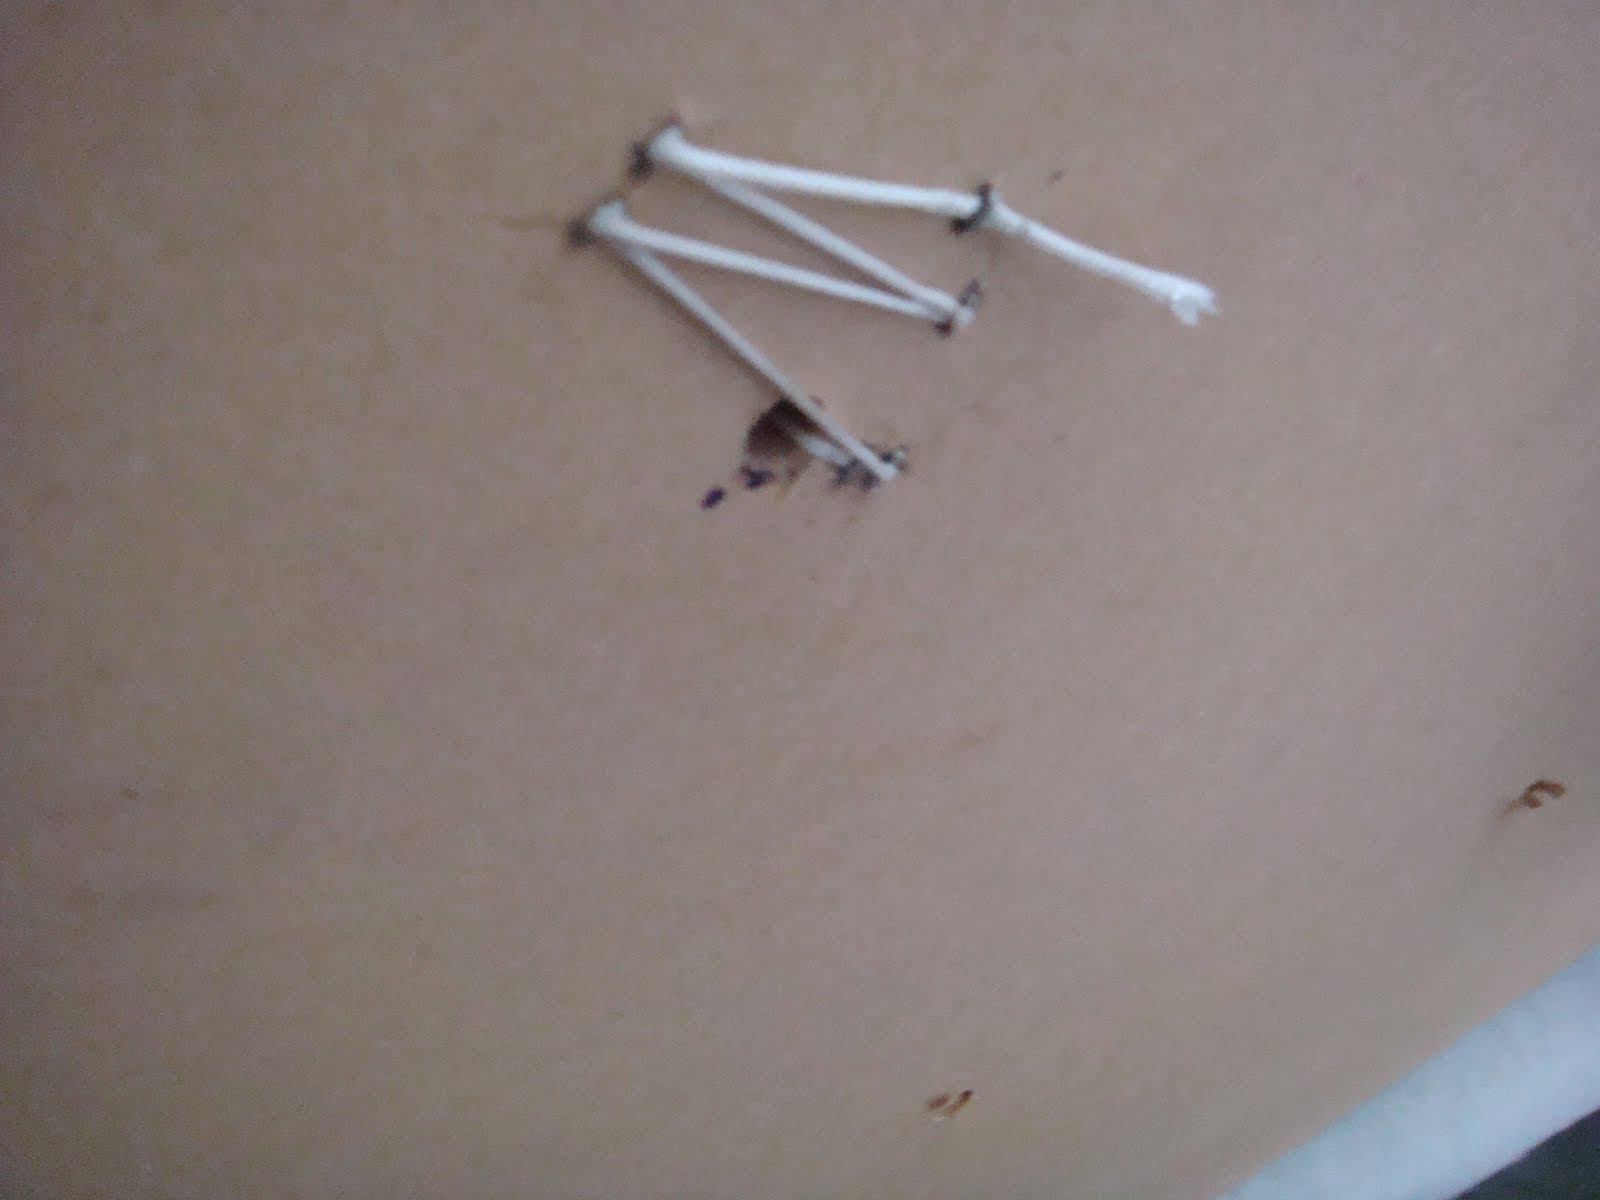
Once John had drilled through the foam and MDF he was ready to use pipe to make even bigger holes in the foam only.


you can use a smaller pipe, that's just what we had at the house. Once all the holes were in, we covered the foam with the batting and the fabric but let it hang over the sides and didn't secure it. Then we threaded the buttons and began tufting. We quickly learned that you need to stick something (we used a pencil) in the bottom of the button holes to see where to place the needle. We pressed the needle into the pencil lead and pushed the pencil down until the needle came out of the hole on the bottom. Once the needle was through John pulled it tight and I pushed the button down into the foam, until it was exactly like I wanted it. Then John secured it with a staple.


He stapled each button 5 times in this zig zag pattern to ensure maximum strength. We started in the middle of the board and kept moving horizontally until the center row was done. Then we repeated the same steps for the other two rows. After a while, it started looking really good:


 Once all of the buttons were tufted, it was time to secure the fabric. Start in the center and gather the fabric to make a crease down to the bottom of the headboard, then staple that section to secure. Repeat this for all of the other buttons. We had a diagonal crease for the corners. Also make sure that all of the corners are stapled and that the corners are rounded properly.  This is how it came out!


Yes that's John showing off his mad staple gun skills. I trimmed the fabric around the edges and it was perfect! To attach it to the bed, John bought two 2 x 4's and I covered them in leftover gray fabric (thank goodness I had enough leftover). He screwed the 2x4s into the metal frame of our bed and then screwed the headboard to those 2x4s from the back. He made sure to measure the 2x4s so that they would be covered by the head board and not be sticking out like horns behind it. 

This is what it looks like assembled in our bedroom


Recognize that gold sunburst mirror! Yep that's one of the one's I DIY-ed before making the headboard. I envisioned the sunburst mirror hanging beautifully above the headboard like this photo


But I guess my spacial concepts were a little off. We make the headboard pretty tall and we have a picture rail in order bedroom, which makes the walls shorter. As you can see above it is mostly covered by the headboard. I am going to see if the smaller one fits there and if not I'll find another spot for it in our house!


Tuesday, July 19, 2011

DIY Sunburst Mirror

Sunburst mirrors have become so big lately. I really love the look of them, but they are typically pretty expensive like these Horchow Mirror, Suzanne Kesler sunburst mirror. So I looked at some other blogs and found an easy one I could make. I got the directions from The Lettered Cottage's blog. I went ahead and ambitiously bought all the required materials:

  • 2 packages of cedar wood shims (these were at Home Depot and not my local hardware store. Make sure they are the longer cedar shims)
  • liquid nails
  • 1 12 inch wood wreath frame (from Michaels)
  • 1 8 inch wood wreath frame (from Michaels)
  • 1 can of spray paint primer
  • 1 can of pure gold (or any color!) spray paint
  • 1 10 inch round mirror (from hobby lobby)


 Once I had all of my materials, I laid out the mirror to make sure it was how I wanted it. Initially, I was going to have two layers like they did in the Lettered Cottage's mirror


See how they have one row of shims about 2 inches longer than the interior shims. It looked really good that way, but it also looked good with just one layer. In the end I went with just one layer.

As a result, I deviated from their directions a little. I used liquid nails to glue each shim to both wreath frames. I did this on my back porch so that the fumes would be minimal and it could dry without being disturbed.


I continued gluing shims down around the entire wreath frame, making sure that the shim ends went with the circular pattern. Then I put another layer of shims to fill in spaces. I used lots of glue and when I was finished I put some heavy books on top of it while it dried. I let it dry for 24 hours.

Then John made a clothes line in our backyard for me to hang the mirror on. We did this so we could spray paint the mirror more easily. You can barely see the string in the picture below.


After it was strung up, I sprayed the entire thing with two light and even coats of primer. Keep your arm moving the entire time you are spray painting to avoid globs.

Once the primer dried, I sanded any rough edges of the shims. If you want it to look really nice you could spend a lot of time making it look smooth, but I just sanded down some wild splinters. Then I sprayed the entire thing with 3 light even coats of gold spray paint, letting it dry in between each coat.
This is what it looked like afterward


After it was dry, I glued the mirror on using liquid nails. Then I put the large books back on the mirror to hold in place while it was drying.


This is what the final product looked like! I love it and can't wait to hang it over our bed. And speaking of our bedroom, we have been busy working on improving it, so there should be some updates on that later in the week. Also, since I didn't do the second tier of shims on the mirror, I had enough left over for a smaller one. I repeated the same process except I used one 6 inch wreath wood frame and a 6 inch mirror. This is how it came out


This guy will probably go somewhere in our formal living room or dining room, but who knows! John is going to attach picture hooks to the back of these, so when he does I'll add a post on how he did that. This mirror was so easy and fun, and cost under $20.

Friday, July 15, 2011

Avocado Mango Salsa

We had a Mexican food potluck this week and I made an Avocado Mango Salsa. It was amazing and everyone raved about it. I wish I would have taken pictures but I forgot. We put the salsa on our tacos, but it would be amazing on grilled chicken or fish or just alone. I seriously thought about eating the whole bowl myself, its that good. Here's the recipe:

  • 3 mangoes, peeled, pitted, diced (about 1 1/2 cups)
  • 4 large avocados, peeled, pitted, diced
  • 1 large shallot, chopped (about 1/4 cup)
  • 1 jalapeƱo chile, seeded, finely chopped (about 1 1/2 tablespoons)
  • 2 tablespoons finely chopped fresh mint
  • 1 lime's worth of  lime juice
  • salt and pepper to taste

I got this recipe from  Epicurious and just adapted it a bit. I used a larger quantity of avocados and mangoes and made them into big chucks. I will definitely be making this again! 

Monday, July 11, 2011

Bookcase Addition

We had two tall Avington Dark Tobacco Bookcases from Target in our office and John decided that they should be moved down to our formal living room.

This is what the living room looked like before


The sad little bookcase on the left was an eye sore (we have plans to stain/paint that guy later, but for now we moved it into the office) and the other side of the couch was painfully empty, so John's idea was pretty good.

This is the living room after with our bookcases in it. They are a lot darker compared to the rest of the wood tones in the room, which kinda stinks but they'll do for now.


They really fit the space beautifully. Once we got the bookcases in their correct positions, John and I had fun decorating them. I found some lion bookends, while thrift store shopping a couple months back and spray painted them white and added them. We grabbed some vases, books, and any other miscellaneous stuff around the house and went to town. This is how they turned out.


 I found myself going out of the way to look at them all day yesterday. They make me happy. Now we need to work on getting some replacement bookcases for the office.