Now that we have our total list of projects we would like to do on our house figured out (found here), I wanted to break them down into the projects I foresee us tackling in the new year. Although the giant list is extremely helpful, it also can be overwhelming. Below is a manageable list (in some order of importance) for the new year!
Projects for 2012
-paint pantry
-add shelves to pantry
-organize pantry
-get bed for office
-re-do the office layout
-paint office
-make curtains for the powder room
-scrape sink in powder room (this has been on my list for a long time but I can't seem to get motivated)
-paint laundry room
-organize laundry room
-remove wallpaper border in guest bedroom
-paint guest bedroom
-add a fountain outside
-add some landscape lights
If we feel inspired/have time we might
-remove some wall paper (I'm already dreading this lol)
-tackle the guest bath
-tackle the kitchen
Thursday, December 29, 2011
Home Repair List
As the year ends, it's a good time to reflect on past projects and plan for new ones. We accomplished a lot on our new house in 2011 - painting the kitchen, painting the powder room, the master bedroom makeover, the informal living room upgrade, and several other small upgrades. We also sold our first house this year!
The following is a list of projects we still want to do on our house. However, we won't be able to do all of them in 2012. This list can seem pretty daunting, but it's also exciting to see all the changes we can make to make our house ours. Since our informal living room upgrade was such a big project, we will probably work on small projects for the first part of the year to "recuperate".
Kitchen
-new counter tops
-add pantry shelves
-paint pantry
-add microwave to cabinet
-figure out final layout
-get new dishwasher and stove
-build a tile back splash
-add drawers to bottom cabinets
-maybe paint or add wallpaper to china cabinet
Powder Room
-make curtains
-scrape sink
Upstairs Hallway
-remove wallpaper
-build chair rail
-paint
-add art work
Guest Bedroom
-refinish dresser
-add curtains
-move trundle to office
-get queen size bed
-paint
-get bed linens
-organize closet with built ins
Office
-rearrange furniture layout
-add trundle bed
-spray paint trundle bed
-get smaller glass desk to make office nook
-paint
-add curtains
-refinish bookcase
Guest Bathroom
-paint
-build subway tile chair rail
-re-do tile floors
-add glass shower
-add shelving
Laundry room
-paint
-add cabinets
Master Bathroom
-add walk-in shower
-build separate toilet room
-get larger vanity
-build walk in closet
-add curtains
Master Bedroom
-create walk in closet or better closet organization
-find small gas logs
Foyer
-remove wallpaper
-get large art piece
-paint
-get upholstered chair?
Informal Living Room
-get side tables
-get lamps
-move gallery wall
Dining Room
-get buffet
-get upholstered arm chairs
Outdoors
-add a fountain
-add landscape lighting
-buy new outdoor dining set
-DIY outdoor coffee table
-add white wicker chair to back porch
-re-do brick patio
-build stairs from bricks on side of house
-remove large tree
Wednesday, December 28, 2011
Salted Caramel Cupcakes
I saw these on pinterest and new I had to make them. The original recipe comes from We are not Martha. I'm kind of obsessed with salted caramel right now and these were a great way to highlight them. These cupcakes were spectacular and everyone loved them. I will definitely make them again. Below is the recipe:
Ingredients:
Cupcakes:
1 1/2 cups all-purpose flour
• 1 teaspoon baking powder
• 1/4 teaspoon sea salt
• 1 stick (1/2 C) unsalted butter, room temperature
• 1 cup plus 2 tablespoons light brown sugar, packed
• 2 large eggs, room temperature
• 1 teaspoon vanilla
• 1/2 cup buttermilk
Directions:
Preheat oven to 325 degrees and line a muffin tin with cupcake liners.
In a medium bowl, combine the flour, baking powder, and sea salt together and set aside.
In the bowl of an electric mixer, cream the butter and brown sugar on medium-high until the batter begins to appear fluffy.

Add eggs, one at a time, until each is well incorporated into the mixture. Then add the vanilla.
Now, in three batches, add the flour and alternate adding the buttermilk, making sure that each previous batch is incorporated before adding the next.

Fill each muffin tin about half way with batter and bake for 15- 20 minutes. Allow cupcakes to cool completely on a wire rack before the next step. It’s difficult to wait but you must.


Remove from heat and allow the sauce cool just slightly.


Enjoy!
Ingredients:
Cupcakes:
1 1/2 cups all-purpose flour
• 1 teaspoon baking powder
• 1/4 teaspoon sea salt
• 1 stick (1/2 C) unsalted butter, room temperature
• 1 cup plus 2 tablespoons light brown sugar, packed
• 2 large eggs, room temperature
• 1 teaspoon vanilla
• 1/2 cup buttermilk
Directions:
Preheat oven to 325 degrees and line a muffin tin with cupcake liners.
In a medium bowl, combine the flour, baking powder, and sea salt together and set aside.
In the bowl of an electric mixer, cream the butter and brown sugar on medium-high until the batter begins to appear fluffy.

Add eggs, one at a time, until each is well incorporated into the mixture. Then add the vanilla.
Now, in three batches, add the flour and alternate adding the buttermilk, making sure that each previous batch is incorporated before adding the next.

Fill each muffin tin about half way with batter and bake for 15- 20 minutes. Allow cupcakes to cool completely on a wire rack before the next step. It’s difficult to wait but you must.

Then cut out little holes in the cupcakes using a sharp knife.


Then start to make the caramel filling. The ingredients and directions for the caramel are below. It's tricky to make caramel so pay special attention to the caramelized sugar it should be golden brown.
Caramel Filling
Ingredients:
• 1/2 cup sugar
• 3 tablespoons salted butter, cubed
• 1/4 cup heavy cream
• 3 tablespoons salted butter, cubed
• 1/4 cup heavy cream
Directions:
In a large pot, melt sugar over medium/high heat. Begin to gently whisk the sugar until it begins to melt. Add the butter and mix until it begins to melt. Incorporate the heavy cream. The mixture will immediately begin to foam and you’ll probably feel like you’re in science class, buts its good. Continue whisking until the sauce is smooth.

Then once the caramel has cooled. Fill each cupcake with about 1 tbsp full.

Then put the missing piece back into the cupcake. It won't look pretty but that's ok because you will cover it with delicious frosting and it will look good.
Now the final part is the salted caramel frosting. This frosting is soo tasty, I ate a lot of the left overs ;).
Salted Caramel Frosting
Ingredients:
• 1/4 cup sugar
• 2 tablespoons water
• 1/4 cup heavy cream
• 1 teaspoon vanilla extract
• 1 stick (1/2 C) salted butter
• 1 stick (1/2 C) unsalted butter
• 1/2 teaspoon sea salt
• 1 1/2 cups powdered sugar
• 2 tablespoons water
• 1/4 cup heavy cream
• 1 teaspoon vanilla extract
• 1 stick (1/2 C) salted butter
• 1 stick (1/2 C) unsalted butter
• 1/2 teaspoon sea salt
• 1 1/2 cups powdered sugar
Directions:
In a saucepan, combine sugar and water and bring to a boil. Cook, without stirring at all, until it starts turning a deep brown/amber. Make sure it doesn't burn, but also make sure its really brown. Remove from heat and very slowly add the cream and vanilla. Lightly mix until the mixture is smooth in texture. It will foam again which is a good sign. Allow the caramel to cool, for about 20-25 minutes, but make sure while it’s cooling you keep an eye on it to make sure you’re still able to pour it. If it gets too thick, you can add a touch of water, reheat on the stovetop, and continue whisking until the caramel is pourable again.
While the caramel is cooling you can start mixing the other ingredients in the stand mixer. In the mixer, beat the butters and salt until fluffy. Slow the mixer speed down a bit and add the powdered sugar, until combined.Using a spatula, scrape the sides of the mixer (just to make sure you get all of the good stuff!) and add in the caramel. Mix until all of the caramel is incorporated.

Now just frost the cupcakes and you are good to go!

Thursday, December 22, 2011
Outdoor Christmas Decorations
Since our living room remodel but us behind in our Christmas decorating, we didn't get a chance to hang Christmas lights. However, in early November, my sisters and mom came into town and we made these amazing wreaths and garland from mesh ribbon. They were fun and easy to make.
This is how they turned out


Next year I think I will add some white lights to it and some red, gold and white ornaments.
This is how they turned out


Next year I think I will add some white lights to it and some red, gold and white ornaments.
New Curtains!
Our informal living is finally finished. We still need to to tweak it a bit but the major construction stage of it is over. Now I get to do the fun decorating part of the room. I had been thinking about what curtains to put in there for about a month. I ordered numerous swatches and pinned several curtains. Honestly, I just wanted to buy some pre-made beautiful curtains, however they can get expensive really fast and I couldn't find any that felt right for the space. So I was fine with making a pair. After lots of consideration, I decided to go with this fabric from Ballard Designs.
We have big windows and I decided I wanted them to be the major color/print of the room. The living room construction process took longer than expected and I was sick so I was getting worried that I would not be able to make the curtains in time. Thankfully one of my good friend's mom makes draperies for a living and she said she had time to make them for me! They came out beautifully (much better than I could ever do). I am thrilled with them!
Here's some pictures


Christmas Decorations
This December has been super busy, I can't believe Christmas is only 2 days away. I just graduated with my M.B.A., John and I were in the middle of our living remodel, and I was sick. All of this contributed to my very late Christmas decorating. But slowly I got the house looking pretty good. Last year I found these pretty burgundy poinsettias with gold centers at Hobby Lobby and put them in my garland on my mantle. I loved them so much that this year I went back and stocked up on them. I think I bought 8 bunches of poinsettias. They come in bouquet form, but I just use wire cutters to cut them off 3 inches below the flower. I added them to everything and love how it came out.
First they went back on the mantle


The garland and wreath are also from Hobby Lobby. I added the poinsettias and gold picks to the plain wreath and garland. I wish the pictures turned out better. It looks great in person. Next year I may have to get new stockings in gold.
Since the poinsettias looked so good there I thought I would carry them over to my tree. Usually we have multicolored lights with multicolored family ornaments. But I thought it would look odd if we add the poinsettias to that, so I used white lights this year and ran gold ribbon around the circumference of the tree every foot or so. Then I picked out only the white, silver, gold, and red ornaments and used them. I love how it came out.
 Here are some more pictures


Then in November, I was in Pottery Barn and saw some really cool console table displays with candles of varying heights. I knew I wanted to recreate this so I bought 2 large gold mercury glass candle holders and 2 small gold mercury glass candle holders. I got some cream pillar candles for them at Target, since Pottery Barn's were pretty pricey.. Then while I was at Target I saw some gold reindeer in the dollar bin (score!) and some gold mercury glass votive candle holders. This is was the same time I got the chairs for our living room and while I was at the stores we got our chairs from I saw some large mercury glass (sensing a theme or obsession lol) ornaments. I thought these would be perfect for the console table. Then it started coming together.

The vase with the sticks is usually there and I thought it would be cool to hang the ornaments from it to make it more festive. Then I put some left over greenery from the tree on the bottom to break up the gold-ness.

Overall, I love how it turned out!. I also decorated the coffee table in there with some greenery.

Then I used some left over clippings from the tree to make a fun centerpiece for our dining room table.


I bought the sugared fruit at Hobby Lobby. It was all together on a stick so I cut the pieces off and placed them in the greenery.
In our other living room, which is finally finished! (pictures to follow shortly). I just added a wreath to the picture frame wall and created a little centerpiece for the coffee table.


Finally, I put some garland in the foyer and used the poinsettias to dress up the garland.

Each room is so festive and I love how it turned out.
Merry Christmas!
First they went back on the mantle


The garland and wreath are also from Hobby Lobby. I added the poinsettias and gold picks to the plain wreath and garland. I wish the pictures turned out better. It looks great in person. Next year I may have to get new stockings in gold.
Since the poinsettias looked so good there I thought I would carry them over to my tree. Usually we have multicolored lights with multicolored family ornaments. But I thought it would look odd if we add the poinsettias to that, so I used white lights this year and ran gold ribbon around the circumference of the tree every foot or so. Then I picked out only the white, silver, gold, and red ornaments and used them. I love how it came out.


Then in November, I was in Pottery Barn and saw some really cool console table displays with candles of varying heights. I knew I wanted to recreate this so I bought 2 large gold mercury glass candle holders and 2 small gold mercury glass candle holders. I got some cream pillar candles for them at Target, since Pottery Barn's were pretty pricey.. Then while I was at Target I saw some gold reindeer in the dollar bin (score!) and some gold mercury glass votive candle holders. This is was the same time I got the chairs for our living room and while I was at the stores we got our chairs from I saw some large mercury glass (sensing a theme or obsession lol) ornaments. I thought these would be perfect for the console table. Then it started coming together.

The vase with the sticks is usually there and I thought it would be cool to hang the ornaments from it to make it more festive. Then I put some left over greenery from the tree on the bottom to break up the gold-ness.

Overall, I love how it turned out!. I also decorated the coffee table in there with some greenery.

Then I used some left over clippings from the tree to make a fun centerpiece for our dining room table.


I bought the sugared fruit at Hobby Lobby. It was all together on a stick so I cut the pieces off and placed them in the greenery.
In our other living room, which is finally finished! (pictures to follow shortly). I just added a wreath to the picture frame wall and created a little centerpiece for the coffee table.


Finally, I put some garland in the foyer and used the poinsettias to dress up the garland.

Each room is so festive and I love how it turned out.
Merry Christmas!
Wednesday, December 21, 2011
Happy Hanukkah!
I'm not Jewish, but I love any excuse to make/eat Jewish food. For this Hanukkah, I made bagels with lox and cream cheese. I always forget how much I like this dish until I make it. I definitely need to make it more often for breakfast or for dinner. I was going to a party so I used mini bagels, which were the perfect serving size. Below is the "recipe".
Ingredients:
4 bagels
1 package of cream cheese
1 package of smoked salmon (lox)
1 jar of capers
1 large tomato sliced
1 onion thinly sliced
Directions:
Toast bagels. I was making this for a group of people and have 14 mini bagels so instead of toasting each one individually, I put them on a baking sheet and cooked them at 350 degrees for 5-10 minutes or until toasted.

While the bagels are toasting begin slicing the tomato and onion.


Once the bagels are toasted, cover them with cream cheese and top with the smoked salmon. I served them like this and put out the tomatoes, onion, and capers for garnishment. So tasty!

Tuesday, December 20, 2011
What to do with Green Tomatoes
So this August in Arkansas it was unusually hot. As a result, most of my garden stopped producing vegetables. However, once things cooled down a bit in September and October, my plants started making up for lost time. Our first frost here in Arkansas wasn't until the end of November, so I had tons of tomatoes but most of them were green.


I put half in my window sill and the other half in a brown paper bag with an apple. The majority of them turned red after a week or so and they were absolutely delicious. It was so nice to be able to have a garden fresh tomato in December. However, I was still left with a lot of green tomatoes. My first thought was to make fried green tomatoes, but then I started thinking about making some green tomato salsa with them. So I came up with this crazy recipe and it was delicious! It's a great way to use up green tomatoes.
Ingredients:
6 large green tomatoes (diced)
1/2 cup of diced onion
3 avocados (diced)
2 tbsp cilantro
1 jalapeno (finely diced)
2 limes
salt and pepper to taste
2 cloves garlic
Directions:
Combine tomatoes, onion, jalapeno, and avocado in a serving bowl. Juice the limes and add to the bowl. Then add seasoning and stir. I let mine salsa sit in the frig overnight to let the flavors meld, but I also ate some right after and it was tasty too.


Thursday, December 1, 2011
How to Build a Chair Rail with Decorative Boxes
I have always wanted a room with a chair rail that had decorative molding boxes below it kinda like the picture below

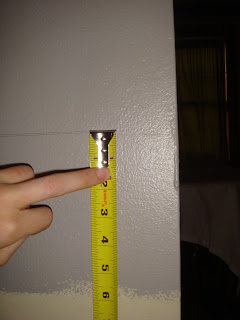
I thought the living room would be a perfect place to add it. First I started with the chair rail itself. I decided how tall I wanted it be (about 3 ft) and measured 3 ft up from the floor all the way around the room
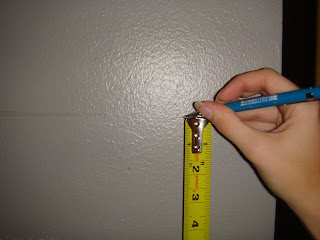
Then I drew a straight line to connect all my measurements.

Then I double checked all my measurements and made sure the line was straight.
I had previous painted the living "Cement" by Martha Stewart half way down, to make it easier later.
After the chair rail lines were drawn, John and I decided we wanted our boxes 4 inches from the chair rail, 4 inches from the baseboard and 4 inches from both sides. So I went around and measured where the boxes would go and drew the corners of all the boxes on the walls. The we added up all our measurements and calculated the amount of trim we needed. Once the trim was purchased, I started sawing the chair rail pieces. We have a circular saw that allows you to cut 45 degree cuts, which is absolutely necessary for trim. I measured each piece of trim and cut it accordingly. The corners had to be cut 45 degrees to match up with the other corner pieces. I was so scared of sawing my fingers off that I didn't get any pictures of it. John helped/supervised most of this, but I did the majority of the saw work. I was pretty proud.
Once the pieces were cut John used a nail gun to nail them on my line on the wall.


He used a stud finder to find the studs and nailed the chair rail there.
After a while the living room looked like this

After the entire chair rail was installed, I primed below the it since it was going to be white. Looking back I should have rolled on at least one coat of the trim paint before installing the boxes because it would have been a lot easier. Maybe next time.
Then it was one to the boxes, which were a lot harder. I measured the boxes I drew on the wall and used the saw to cut those pieces. Each edge had to have a 45 degree cut so that all of the corners could match up. This was super tricky, I kept sawing pieces the wrong way or upside down. We ended up have to get another 12 ft of trim because of the mistakes, but eventually I got the hang of it.
Once you have your 4 box pieces cut then lay them down on the floor.

The pick one corner to start with. Match the ends up perfectly and do not worry about the other box pieces.

Stand on the trim to hold it in place and use a nail gun to secure the two pieces together.

Make sure the nail gun is level or you could have the nail go through the floor or your foot. Then repeat the process for the other corners of the box.
Once your box is complete, hold it up against your markings and make sure it looks straight and fits right. Make any necessary adjustments. Then glue the back of the box with construction adhesive.

Find the studs and mark where they are on the wall. Then push the box into place and smush (yes that's a technical term ;) it a bit to get the glue to stick.

Double check that the box is still in the right spot, it may slide down a bit.

Then when you are sure it is in the right spot, use the nail gun to nail the box to the studs.

Repeat this process for all the remaining boxes.
This is what our living room looked like after all the boxes were installed.


Ignoring the messy chaos in the rest of the room, its starting to look good.
FYI: we had to make some special cuts to make way for things like electrical outlets. Make sure you take any anomalies (outlets, vents, etc.) into account before sawing.
Next up is painting the boxes and the drywall. Also John will be installing lighted crown molding in the living room too. I can't wait for it to be finished.

I thought the living room would be a perfect place to add it. First I started with the chair rail itself. I decided how tall I wanted it be (about 3 ft) and measured 3 ft up from the floor all the way around the room

Then I drew a straight line to connect all my measurements.

Then I double checked all my measurements and made sure the line was straight.

I had previous painted the living "Cement" by Martha Stewart half way down, to make it easier later.
After the chair rail lines were drawn, John and I decided we wanted our boxes 4 inches from the chair rail, 4 inches from the baseboard and 4 inches from both sides. So I went around and measured where the boxes would go and drew the corners of all the boxes on the walls. The we added up all our measurements and calculated the amount of trim we needed. Once the trim was purchased, I started sawing the chair rail pieces. We have a circular saw that allows you to cut 45 degree cuts, which is absolutely necessary for trim. I measured each piece of trim and cut it accordingly. The corners had to be cut 45 degrees to match up with the other corner pieces. I was so scared of sawing my fingers off that I didn't get any pictures of it. John helped/supervised most of this, but I did the majority of the saw work. I was pretty proud.
Once the pieces were cut John used a nail gun to nail them on my line on the wall.


He used a stud finder to find the studs and nailed the chair rail there.
After a while the living room looked like this

After the entire chair rail was installed, I primed below the it since it was going to be white. Looking back I should have rolled on at least one coat of the trim paint before installing the boxes because it would have been a lot easier. Maybe next time.
Then it was one to the boxes, which were a lot harder. I measured the boxes I drew on the wall and used the saw to cut those pieces. Each edge had to have a 45 degree cut so that all of the corners could match up. This was super tricky, I kept sawing pieces the wrong way or upside down. We ended up have to get another 12 ft of trim because of the mistakes, but eventually I got the hang of it.
Once you have your 4 box pieces cut then lay them down on the floor.

The pick one corner to start with. Match the ends up perfectly and do not worry about the other box pieces.

Stand on the trim to hold it in place and use a nail gun to secure the two pieces together.

Make sure the nail gun is level or you could have the nail go through the floor or your foot. Then repeat the process for the other corners of the box.
Once your box is complete, hold it up against your markings and make sure it looks straight and fits right. Make any necessary adjustments. Then glue the back of the box with construction adhesive.

Find the studs and mark where they are on the wall. Then push the box into place and smush (yes that's a technical term ;) it a bit to get the glue to stick.

Double check that the box is still in the right spot, it may slide down a bit.

Then when you are sure it is in the right spot, use the nail gun to nail the box to the studs.

Repeat this process for all the remaining boxes.
This is what our living room looked like after all the boxes were installed.


Ignoring the messy chaos in the rest of the room, its starting to look good.
FYI: we had to make some special cuts to make way for things like electrical outlets. Make sure you take any anomalies (outlets, vents, etc.) into account before sawing.
Next up is painting the boxes and the drywall. Also John will be installing lighted crown molding in the living room too. I can't wait for it to be finished.
Subscribe to:
Posts (Atom)